Labels

Tuesday, June 11, 2019

How to get Dynamics CRM – Online Data into Power BI


In this post we will see how we can get Dynamics CRM data into Power BI.
Open power bi desktop Go to à Home Tab à click on Get Data it will open all available data sources.

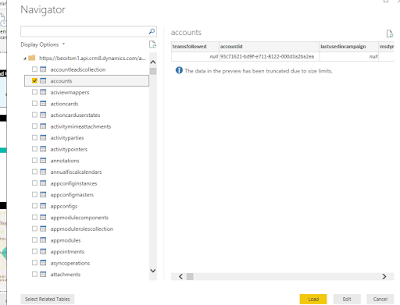
Select Dynamics D365 à Provide your web API URL of D365 instance. It will load all entity select required entity.


Provide your CRM instance organization URL


Provide your CRM instance credentials in the Organization account tab.


After clicking on ok it will load all your entities. like as

Select the entities on which you want to perform reporting operation.


After Selection of Entities Power BI Home Page will appear as shown below.


Wednesday, May 29, 2019

Power BI:


Power bi used for to display your data into visualization. Its support a lot of data resource like
SQL, CRM, excel, csv etc.

Generally Power BI is a reporting tools like SSRS and Crystal report, by using this we can display our record in graphically.


For more information visit to Microsoft link…

It’s come under 3 section
  •  Power bi desktop 
  •  Power bi services 
  •  Mobile Power BI


1.       Power BI Desktop: It’s a free desktop application you can install in your system. You can perform connect, visualization and transform of your data. From here you can connect to multiple data sources.
2.       Power BI Services: Using this we can publish our desktop power bi report to power bi services. This is a cloud service and is used to publish Power BI reports and data visualizations
3.       Mobile Power BI: available on Windows phones and tablets, as well as for iOS and Android devices.


How to download Power BI Desktop:


                            https://powerbi.microsoft.com/en-us/desktop/


Wednesday, August 15, 2018

Rollup Fields


Rollup Fields is one of the interesting new feature which provides a way to perform a record level aggregation from child records to its parent record.
This avoids plug-in development and can be easily achieved by end users through simple setup and settings itself without any code involved.
Let’s take an example to explore implementation and working of rollup fields.
We want to show total count of all contacts associated with an Account and its Child Accounts on Account form.
Rollup field setup:
To achieve this we will first start with creating new Rollup field for Account as shown below:


Here you can see that the field type which we have selected is of type “Rollup” and the data type which we have selected is of type “Whole Number”.
The Data Type of the Rollup field must match the Data Type of the field for which we want to calculate the rollup. So if we want to show rollup of a field for Contact on Account form then the data type of rollup field must match the data type of the field for which we want to calculate rollup.
Also, you can see the “Edit” button besides “Rollup” selected Field Type. Whenever we select field type as “Rollup”, Edit button appears next to the Field Type and that brings up one editor screen which is similar to the “Business Rules” screen. Please refer the below screen:

Here we can specify the filters, conditions and aggregations which will be applied to the rollup field. The details are explained below,
1.    The source entity which is taken by default to be the entity for which the rollup field is created. In our example it is “Account” entity hence the “Source” is by default “Account”.

2.    Use Hierarchy can be set to Yes/No for utilizing parent-child relationship. In our example we want to get aggregation for all Child Accounts of an Account hence we have set it to “Yes”


3.    We can apply filters for source entity using the “Filters” option where we can specify the conditions to apply.
4.    When we want to get aggregation of related entity data in our rollup then we specify the “Related Entity”. In our example since we want to show total count of all the contacts present for an Account and its Child Accounts, we have selected “Contacts (Company Name)” as the “Related” entity.
5.    If we want to apply filters for related entity then we can do that by adding filter conditions in “Related Entity”. In our example since we want to show total count of all the contacts present for an Account and its Child Accounts we have added filter condition to check if “Status” equals “Active” for related opportunities
6.    And finally we specify the aggregation function which we want to apply and for which field. In our example since we want to show all Contacts for an Account,  we have selected the aggregate function as “Count”.

User Interface:
The Rollup Field that we just created will be seen on the “Source Entity” form i.e. account form:


So the total Contacts for a particular Account will be calculated and shown in this “Total Contacts” Rollup field for that Account . If the Account has Child Accounts then the total of Contacts for that Account along with  its Child Account’s Contacts will be calculated and shown in this “Total Contacts” Rollup field for that Account.
Rollup fields are read only. On this Rollup field you can see the “Refresh” icon attached to the Rollup field. Since rollup operates asynchronously, it is calculated on hourly basis. But we can also self-trigger the rollup field calculation by hitting this “Refresh” icon and perform the re-calculation.
Notes: 
Each rollup attribute for an entity has two supporting attributes for the rollup attribute which automatically gets created when a rollup field is created:
§  <attribute SchemaName>_Date: DateTime – When the rollup was last calculated
§  <attribute SchemaName>_State: Integer – The state of the rollup calculation
Following are the State values:
0 – Not Calculated: Attribute value is yet to be calculated
1 – Calculated: Attribute value has been calculated per the last update time in 
<attribute SchemaName>_Date attribute
2 – OverflowError: Attribute value calculation lead to overflow error
3 – OtherError: Attribute value calculation failed due to an internal error, next run of calculation job will likely fix it
4 – RetryLimitExceeded: Attribute value calculation failed because the maximum number of retry attempts to calculate the value were exceeded likely due to high number of concurrency and locking conflicts
5 – HierarchicalRecursionLimitReached: Attribute value calculation failed because maximum hierarchy depth limit for calculation was reached
6 – LoopDetected: Attribute value calculation failed because a recursive loop was detected in the hierarchy of the record
Request/Response Messages provided for Rollup Field calculation: 

Supported Data types:
Rollup field is not supported by all data types and only following data types support rollup field:
  •     Whole Number
  •   Decimal
  •    Currency
  •     Date & Time


Limitations:
1.    Rollup works on 1: N relationship. They don’t work on N-N relationship
2.    Rollup field cannot use another Calculated or Rollup field for rollup
3.    For Complex field calculations we need to still rely on plug-in or java script
4.    Rollup fields don’t raise the event to trigger workflows
5.   We can have maximum of 100 rollup fields within an organization and each entity can have no more than 10 rollup fields.


Tuesday, August 7, 2018

Images in Dynamics CRM


Images in CRM:
Images are the snapshots of the entity's attributes, before and after the core system operation. 

Pre Image: 
A pre-image is a snapshot of the entity’s attributes before the core operation.
Availability of Pre Images for the Plugin stages.


Post Image: 
A post-image is a snapshot of the entity’s attribute after the core operation.
Availability of Post Images for the Plugin stages.


Plugins In Dynamics CRM


Plugins:
A plugin is a custom business logic (code) that you can integrate with Dynamic CRM to modify or argument the standard behavior of the platform.

Plugin Event execution pipeline:
The Dynamics CRM 365 event processing subsystem executes plug-ins based on a message pipeline execution model.
A user action in the Microsoft Dynamics 365 Web application or an SDK method call by a plug-in or other application results in a message being sent to the organization Web service.
This message contains business entity information and core operation information. The message is passed through the event execution pipeline where it can be read or modified by the platform core operation and any registered plug-ins

Pipeline Stages
The event pipeline is divided into multiple stages, of which 4 are available to register custom developed or 3rd party plug-ins.
Multiple plug-ins that are registered in each stage can be further be ordered (ranked) within that stage during plug-in registration.

Event
Stage name
Stage number
Description
Pre-Event
Pre-validation
10
Stage in the pipeline for plug-ins that are to execute before the main system operation. Plug-ins registered in this stage may execute outside the database transaction.
Pre-Event
Pre-operation
20
Stage in the pipeline for plug-ins that are to execute before the main system operation. Plug-ins registered in this stage are executed within the database transaction.
Platform Core Operation
Main Operation
30
In-transaction main operation of the system, such as create, update, delete, and so on. No custom plug-ins can be registered in this stage. For internal use only.
Post-Event
Post-operation
40
Stage in the pipeline for plug-ins which are to execute after the main operation. Plug-ins registered in this stage are executed within the database transaction.

Developing a Sample Plugin:


Add a class library project into the C# solution and name your class "MyFirstPlugin". 


Add references to the 2 DLLs. 

  • Microsoft.Crm.Sdk.Proxy.dll
  • Microsoft.Xrm.Sdk.dll

You will find both of the DLLs in the SDK/bin folder of your latest SDK. 

Inherit the IPlugin interface. 


Implement the IPlugin Interface and you will get an Execute method with the IserviceProvider interface object as a parameter.

Execute method: 
This method runs as an entry point for any plugin in Microsoft Dynamic CRM.

IserviceProvider interface: 
This interface provides access to various services of dynamic, this interface has a method called GetService() that uses the reflection feature of .NET and allows us to get any type of service we want. 


Once you’ve implemented the ITracingService within your code, you can then write to Trace Log at any time in your code using the following snippet:
tracingService.Trace("Insert your text here...");


Since we need to trigger our plug-in when an event is executed, we need to get the service of IPluginExecutionContext using the IServiceProvider object.


And the GetService method returns an object of the specified type. We need to type caste that object. 

IOrganizationServiceFactory:
Return an IOrganizationService instance for the organization that the specified user is a member of.


Plugin execution is an object with a property called InputParameter. 
  • Using this Inputparamter we can get the entity and other types of dynamic CRM. 

  • Target is one of the main parameters of this IPluginExecutionContext object.

  • All the plug-in events are first stored in this variable called “Target”.

  • When any events occur we need to check if this variable is there in our current context execution.

  • And if so then we need to check if it's an entity.


Step 3
Now when you know, we have a value in the target and it's an Entity.

Then typecast it into an Entity and using its logicalname property we can determine if the current executing event is for an entity or not.

Below is the Sample Plugin Code for Auto Increment Number.

using System;
using System.Collections.Generic;
using System.Linq;
using System.Text;
using System.Threading.Tasks;
using Microsoft.Xrm.Sdk;
using Microsoft.Xrm.Sdk.Query;

namespace Appeal_Update
{
   public class TicketNumber : IPlugin
    {
        public void Execute(IServiceProvider serviceProvider)
        {
             ITracingService tracingService =
               (ITracingService)serviceProvider.GetService(typeof(ITracingService));

            // Obtain the execution context from the service provider.
            IPluginExecutionContext context = (IPluginExecutionContext)
                serviceProvider.GetService(typeof(IPluginExecutionContext));
            // Obtain the organization service reference.
            IOrganizationServiceFactory serviceFactory = (IOrganizationServiceFactory)serviceProvider.GetService(typeof(IOrganizationServiceFactory));
            IOrganizationService service = serviceFactory.CreateOrganizationService(context.UserId);


            // The InputParameters collection contains all the data passed in the message request.
            if (context.InputParameters.Contains("Target") &&
                context.InputParameters["Target"] is Entity)
            {
                // Obtain the target entity from the input parameters.
                Entity entity = (Entity)context.InputParameters["Target"];

                // Verify that the target entity represents an account.
                // If not, this plug-in was not registered correctly.
                if (entity.LogicalName != "new_ticket")
                    return;
                try
                {

                    int i = 0;

                    QueryExpression query = new QueryExpression("new_ticket");

                    query.ColumnSet.AddColumns("new_ticketnumber");

                    EntityCollection listentities = service.RetrieveMultiple(query);

                    if (listentities.Entities.Count > 0)
                    {

                        foreach (var item in listentities.Entities)
                        {

                            i = (int)item.Attributes["new_ticketnumber"];

                        }

                        entity.Attributes["new_ticketnumber"] = i + 1;

                    }

                    else
                    {

                        entity.Attributes.Add("new_ticketnumber", 1);

                    }

                }
                catch (Exception ex)
                {
                    tracingService.Trace("TicketeNumber: {0}", ex.ToString());
                    throw;
                }
            }
        }
    }
}

Build your Project. 

Once you build your project, you need to generate a key that will act as certificate for your plug-in. Without this key you cannot deploy a plug-in onto a server. 

To create a key, go to project property (ALT+ Enter) and go to the signing tab and check sign the assembly. 

Select new in the drop down and add a key name and your dynamic CRM Password. And select save (CTRL+ S).

If you have done this then it will add a pfx encrypted key for your current project. 

Rebuild your project 


Procedure to deploy this assembly using SDk\Tools\PluginRegistration\PluginRegistration.exe.

Step 1 
  • Run it and Click Create New connection,
  • Enter your Login Credentials for Connection with Dynamic CRM.
  • The first time you login, you need to pass all the details of your CRM Account.

Step 2

After logging in successfully, click Register > Register New Assembly.

Browse to the DLL you just created and click OK. 


Step 3
  • Now we need to add steps of this DLL execution.
  • So select the assembly and again click Register > Register new Steps.
  • Or just right-click the assembly you just added and select Register new Steps.


This Window includes an option for how and when you want to execute or fire your assembly or plug-in. 

Message: It defines on which event you want to run the plug-in.

Example: Create.

Primary Entity: It define on which Entity execution you want to run the plug-in.

Example: Ticket.


Event pipeline stage of Execution: It defines when you want to run the DLL, before the core operations or after the core operations.

Execution Mode:
 Execution can be synchronous by default or can be asynchronous (that will be handled further by the Dynamic CRM Queue manager).

Deployment: Server where every plug-in is deployed.


Click Register New Step and it's done.

Your assembly or plug-in is deployed on the server.
Now go to Dynamic CRM and create an Ticket and save it .Then an incremented number will be updated in the field.